
Friday, August 31, 2012
Thursday, August 30, 2012
2011 August Card Class- Summer Silhouettes
This is the final card we made during August card class.
It features the stamp set entitled "Summer Silhouettes" found on page 82.
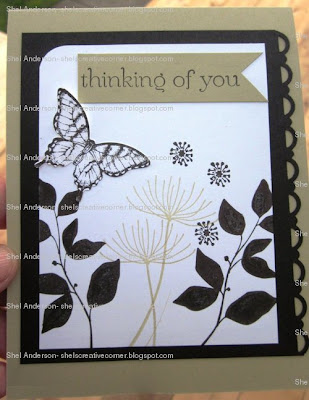 The card base is River Rock, and the mat is Basic Black. I punched one side of the mat with a border punch. The stamped images are stamped in River Rock ink and Basic Black ink. The butterfly is stamped from the Pappillon Potpourri stamp set on page 115, then punched out with the new butterfly punch found on page 184. The greeting was stamped and then "flagged" using the square punch found on page 183.
Very striking card.....
It features the stamp set entitled "Summer Silhouettes" found on page 82.

Very striking card.....
Wednesday, August 29, 2012
2012 August- Paper Pierced Card
This is the third card we made in August card class. It features paper piercing techniques using the new paper piercing templates.


We made this using the large 2 1/2" circle punch, a small heart punch, a large heart punch, and the scalloped border punch. We assembled the card front and then pierced it using the paper piercing templates on page 181 with the new paper piercing tool and the new stampin pierce mat. Then it was mounted on a Rich Razzleberry card base. Doesn't the piercing just finish this card nicely?
Tuesday, August 28, 2012
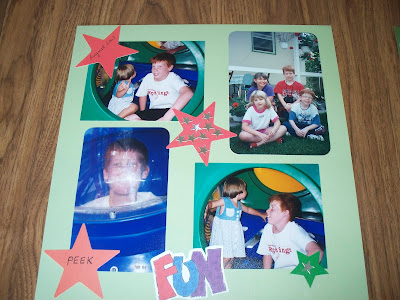
2012 August Scrapbooking Class- Layout 3- Word Search
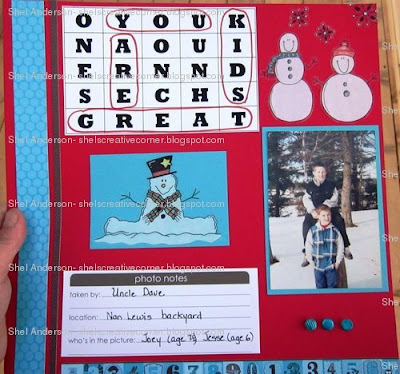
This is the third layout we made during Augusts Scrapbooking Class.
It features a Word Search puzzle as the title- how cool is that!
I just used an Excel spreadsheet and formatted the letters in a way that I could have it spell out my title!
It features a Word Search puzzle as the title- how cool is that!
I just used an Excel spreadsheet and formatted the letters in a way that I could have it spell out my title!

This layout features my sons, now grown men, when they were just 6 and 8 years old.....talk about a trip down memory lane for me! A journalling card with "fill in the blanks" was a cute addition. I used "foam candy" under the photo and just used permanent bic markers to color them to match my layout.
Monday, August 27, 2012
2012 August Card Class- card two- Pretty Postage Emboss Resist
This is the second card we made in August card class.
It features two techniques. The card base technique is called " Artist Canvas" and is achived by rubbing the ink pad direct to paper and then filling in the open areas with a coordinating color and a sponge. The colors used here were Crumb Cake and Midnight Muse.
The focal image features the "Emboss Resist" technique and is achieved by stamping an image with clear embossing powder and versamark. Heat set with the heat gun. Then using sponges sponge color all over the image as desired. Here i used Midnight Muse and Soft Suede. Then use a dry papertowel to remove the excess ink from the embossed areas.
My girls LOVED this card....so much fun!

Saturday, August 25, 2012
2012 August Card Class
This is the first of four cards we made in August card classes. I love the clean and simple lines of this card. We used the new in color, gumball green along with early espresso and whisper white cardstock. The stampset is entitled My Friend and is found on page 122. The butterflies are from the Beautiful Wings embossalit on page 188.

Wednesday, August 22, 2012
2012 August Scrapbooking Class- Distressing
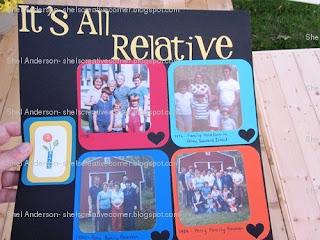
In this layout, we had a lot of fun with the Zutter Distress-It-All.....an electric tool that does all the hard work of distressing your edges. You can just distress a little....or a lot.
We also used assorted Ranger distress inks and the distressing tool with sponge applicators....messy but oh so fun!
A cute little paper bag and a tag for journalling are a great addition to this page along with the distressed metal bookplate that I attached with brads.....
This layout is my Dad and Mom when they first started dating.......I LOVE the way this page turned out and the black and white photos!

Monday, August 20, 2012
Product Talk- Stampin' Up! Cardstock

Stampin' Up!'s high-quality card stock is dyed with pure color all the way through, so you'll never get a white core! Once you have tried this cardstock, you will never purchase any other brand....I believe it is the BEST out there.
80-lb., high-quality card stock
Dyed all the way through—no white core
Coordinates with Stampin’ Write Markers, Stampin’ Ink, Stampin’ Pastels, and Watercolor Wonder Crayons
Available in 8-1/2" x 11" and 12" x 12" sizes
Acid free, lignin free, buffered
8 1/2" x 11" Single-color package: 24 sheets of 1 color
8 1/2" x 11"Assortment package: 20 sheets, 2 each of 10 colors
8 1/2" x 11"In Color assortment: 20 sheets, 4 each of 5 colors
12" x 12" single-color package: 12 sheets of 1 color
12" x 12" Assortment package: 20 sheets, 2 each in 10 colors
12" x 12" In Color Assortment: 20 sheets, 4 each in 5 colors
FYI As with any dye manufacturing, card stock colors may vary somewhat among dye lots. The card stock is monitored continually for significant changes, but slight variations in the color are not considered defects. These colors are designed to coordinate with our ink colors. In some cases they may not match perfectly.
Saturday, August 18, 2012
2012 Aug Scrapbook Class- Layout One
Here is the first of three layouts we did in August Scrapbooking Class-it is a RECYCLING PAGE.....yes those beautiful colored mats are actually paint chips!
So next time you are at the hardware store....don't leave without visiting the paint department. There are many sizes and shapes available.
I used the heart punch to punch out the color numbers- and you cant even tell they were paint chips- how cool is that.
If you look around you there is lots and lots of stuff you can use and recycle into your layouts- envelopes, admail, greeting cards, receipts, ticket stubs, promotional material etc.....look around and see what you can come up with.

Friday, August 17, 2012
Flat Bows- Tutorial
Helpful Tips and Techniques- Flat Bows
I used to always have a hard time getting "flat tails" on my knots, until I was shown this little tip.
You will need just three items: ribbon, scissors and your stampin mist bottle.
Tie a piece of ribbon in a double-knot around your Stampin' Mist bottle and remove it from the bottle.
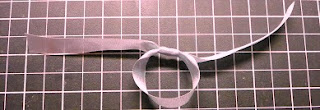 Using your scissors to snip the loop, right in the center diagonally.
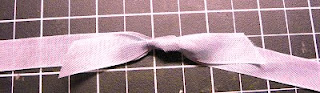
Pull both pieces of ribbon until they are tight and look like the photo.
I used to always have a hard time getting "flat tails" on my knots, until I was shown this little tip.
You will need just three items: ribbon, scissors and your stampin mist bottle.
Tie a piece of ribbon in a double-knot around your Stampin' Mist bottle and remove it from the bottle.

Pull both pieces of ribbon until they are tight and look like the photo.

Now use sticky strip to adhere it to your card front....easy peasy....and perfectly flat!
Thursday, August 16, 2012
Scrapbook Challenge Sketch
A big thanks to Dorothy W. for playing along with our scrapbook challenges....great page Dorothy!


Wednesday, August 15, 2012
July Free Crop.....such a FUN day!
Free crop for July was postponed and actually held on Saturday August 3rd.
The group was very small this month, but we had SO MUCH FUN!
We created cards and scrapbook pages, shared news and stories and laughed until our sides hurt.
I had a conversation a few weeks ago with one of my girls ( who shall remain nameless) that has never had seafood - with the exception of fish and chips.
Well being an east coast girl, that is just a CRIME. So I opted to fix that!
At free crop we all bring something for a potluck lunch....and it was my turn to bring the main course.....so I opted to force "nameless non seafood eating girl" to try some.
I made a hearty homemade seafood chowder that had shrimp, fish, clams, lobster and crab in it. And everyone loved it. YEAH!
Dorothy brought some big yummy soft squishy buns to go with it, and Hayley made these amazing " Fairy Cakes" -can you see their little wings?

 A great photo of Dorothy refuelling the coffee mug!
And my handsome hubby Mike on a well deserved break from his carpentry project, caught with his hand in the "Fairy Cake" jar- poor guy doesn't get any home baking since the kids are all gone. He sure liked Hayley's fairy cakes. 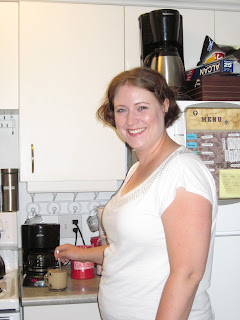

And this is Miss Hayley refuelling the coffee cup too! 

And this is me- recovering from side splitting laughter after telling the story of the guy I saw walking down Pembina Highway at 6:30 in the morning- too funny!
Well I think these photos are going to become a scrapbook page....cause it was a fun day that I want to remember it! Thanks girls!
Tuesday, August 14, 2012
Card- Sweet Floral Anniversary

Here is a sweet card I made for our dear friends Dorothy and John for their anniversary in July.
I used the sweet floral background stamp setwith cherry cobbler ink and always artichoke ink. I stamped the floral image three times and fussy cut some of the flower pieces and stacked them on the original image using dimensionals for a great 3D effect. LOVE IT!
Friday, August 10, 2012
Guest Scrapbooker....Dorothy W
Here are some scrap pages shared by guest designer Dorothy W.
Great job Dorothy! Thanks so much for sharing!
 Isn't this is a fun kids layout!
 This was a page we did in August's scrapbooking class, where the girls learned how to make these flowers with punches! Dorothy chose a beautiful river rock colored background with so saffron flowers- beautiful!

This layout features her children when they were young counting and rolling pennies.....won't be long and the Canadian penny will be long forgotten....sad.
Great job Dorothy! Thanks so much for sharing!
 Isn't this is a fun kids layout!
 This was a page we did in August's scrapbooking class, where the girls learned how to make these flowers with punches! Dorothy chose a beautiful river rock colored background with so saffron flowers- beautiful!
This layout features her children when they were young counting and rolling pennies.....won't be long and the Canadian penny will be long forgotten....sad.
Wednesday, August 8, 2012


Monday, August 6, 2012
DIY Pancakes in a Jar- who'd a thunk it?
 Photo: Danny Boy & the Rabbit
That's right. I said bake IN a jar, not from a jar. This recipe is so easy it will leave you wondering why you ever bothered to make pancakes any other way.
Danny from Boy & the Rabbit will give you the recipe for these yummy blueberry pancakes (only six ingredients) right here on his blog. And guess what? Your microwave will be doing the baking, so you won't have to slave away at the griddle for this one.
Here is the link to the recipe blog: http://boyandtherabbit.wordpress.com/2012/07/28/blueberry-pancake-in-a-jar/
Sunday, August 5, 2012
Card- Need for Speed- Masculine -July 2012
This is the fourth card we made at July's card classes:
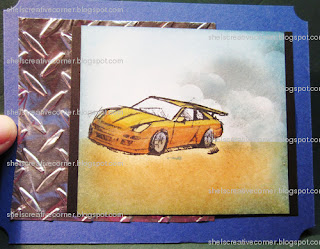
This was sooo fun. We used tinfoil and created the diamond plate background using an embossing folder and the Big Shot.
Then using sponges, ink pads and masks we created the focal image. The car is from the Need for Speed stamp set.

This was sooo fun. We used tinfoil and created the diamond plate background using an embossing folder and the Big Shot.
Then using sponges, ink pads and masks we created the focal image. The car is from the Need for Speed stamp set.
Saturday, August 4, 2012
Card- Reason to Smile- Birthday-July Card Classes- card 3 of 4
This is the third card we made in July's card classes:

This was made using the exlclusive promo stamp set Reason to Smile that was just $5.00 during the month of July. The greeting is from the Petite Pairs stamp set. The bottom of the card is "debossed" using one of the new edge embossing folders and cut using the coordination scalloped die.

This was made using the exlclusive promo stamp set Reason to Smile that was just $5.00 during the month of July. The greeting is from the Petite Pairs stamp set. The bottom of the card is "debossed" using one of the new edge embossing folders and cut using the coordination scalloped die.
Friday, August 3, 2012
Card- Forever Young-Other-Top Fold July 2012
This is the second card we made at July's card classes:

The girls learned how to make a top fold card using the simply scored. The tree image is from the Forever Young stamp set and it was heat embossed. A few punched embellisments from the new butterfly punch, trio flower punch and the scallop eyelet border punch is all it took to complete this card.

The girls learned how to make a top fold card using the simply scored. The tree image is from the Forever Young stamp set and it was heat embossed. A few punched embellisments from the new butterfly punch, trio flower punch and the scallop eyelet border punch is all it took to complete this card.
Thursday, August 2, 2012
Card- Embellished EventsBirthday- Spritzer- Z fold-July 2012
This is the first card we made in July's card classes:

The girls learned how to make this mini z fold card with a belly band. How cute! The birthday cake image was created using the marker direct to stamp. Then we used the color spritzer to give a speckled look for a textured background.

The girls learned how to make this mini z fold card with a belly band. How cute! The birthday cake image was created using the marker direct to stamp. Then we used the color spritzer to give a speckled look for a textured background.
Wednesday, August 1, 2012
Card-High Heels

This is a card that I made using a paper piecing pattern that I purchased from a fellow demonstrator in Australia.
It is a really cute high heeled shoe with different variations, and opens like a regular card at the back of the heel.
I can't wait to try this with black embossing powder and rhinestones!
Subscribe to:
Posts (Atom)