

Friday, November 30, 2012
Blast from the past.....
Thursday, November 29, 2012
Clean and simple Christmas.....

Wednesday, November 28, 2012
Pink for Christmas....

Tuesday, November 27, 2012
Embossed Cherry Cobbler

This clean and simple card was a class favorite. It features cherry cobbler and whisper white cardstock. It was embossed with the edge embossing folder. The greeting is from Perfectly Penned stamp set and the ribbon is cherry cobbler scalloped tulle ribbon
Monday, November 26, 2012
9th Week of Christmas.....easy gift tags.....

Easy and quick handmade gift tags....
Supplies needed:
Tags Til Christmas Stamp Set pg 11 $27.95
Gumball Green Ink Pad pg152 $7.25
White Card stock pg 156 $9.25
Decorative Label Punch pg 182 $22.95
Simply stamp the image on white card stock and punch out with the modern label punch. If you want to dress it up a bit...use markers to color the stamp- chocolate chip for the pine cone, gumball green for the branch and real red for the frame and words. Add a bit of dazzling details to the branch for a glittery effect.
Sunday, November 25, 2012


Wednesday, November 21, 2012
8th Week of Christmas...two easy gift ideas.....


Supplies Needed:
Aluminum Flashing or pop cans
Snowflake die
Big Shot
Tea light candles
Process:
This is oh so simple...use your snowflake die to cut out two aluminum snowflakes- personally I prefer the pop cans as it adds a bit of color along with the silver color.
Carefully bend and shape the snowflakes to accept the tea light. Use crystal effects to glue the two snowflakes together (I clamped them until they were dry. Then I just placed the tea light in the center....this way when the candle has burned up, I can easily replace it.
This is a very quick, inexpensive and lovely gift idea for the holiday season....who doesn't love a beautiful handmade with love gift.
Another idea is that you can use two of the single snowflakes as tree decorations....just bend them together for a 3D effect and add some pretty ribbon to hang it on your tree.
Tuesday, November 20, 2012
Tuesday's Tip...
Each Tuesday, I will be featuring a simple tip to make your scrapping and card making a little bit easier.
Be sure to let me know what you think.
If you have ever stamped a solid image (especially with the older felt pads) and find that there are white spaces because the ink did not completely cover, I have a fix for that!
Grab a blender pen...touch it to the side of the ink pad to pick up some ink and fill in your white spots- voila- no more "patchy" image.
How easy is that?
Monday, November 19, 2012
Monday Madness.....
Hello Everyone!
Yes, Monday's are usually a madhouse....but this one is particularly so as I am trying to play catch up with everything I did not get done yesterday.
 Card Challenge:
I must apologize for my weekly sketches being late....I was hit with a wicked headache yesterday, so bad I could not sit upright.
Thankfully I am feeling a little better today...so here are your weekly sketch challenges:
Scrapbook Challenge:


I haven't received any of your challenges back in quite a while....c'mon ladies- share your pages so we can inspire others!
Saturday, November 17, 2012


Friday, November 16, 2012
Week of Scrap- Day Four
Challenge: Flourishes, Stickles and Pearl Pen

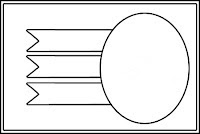
Challenge: Peek a Boo Window and Flag

Thursday, November 15, 2012
Week of Scrap- Day 3
Challenge: Filmstrip and Stars

Challenge: White Ink and Iridescent Glimmer Spray

Wednesday, November 14, 2012


Tuesday, November 13, 2012
Week of Scrap- day one
Each month, I make a framed art piece from my scaps.....here are a couple of samples:


Monday, November 12, 2012
On The Seventh Week of Christmas.....
my demonstrator showed me how to make easy and super cute gift tags!

Supplies Used:
Very Vanilla Cardstock 6" x 3"
Be of Good Cheer DSP 2" x2"
Hole Punch
Mitten Punch
Greeting Stamp- Four the Holidays
Bakers Twine
Saturday, November 10, 2012
Owl wish you a Merry Christmas.....

Friday, November 9, 2012
Lovely as a Tree....
.jpg)
This easy card is made with the Lovely as a Tree stamp set on page /4 #127793 $24.95 . The Whisper White and Midnight Muse cardstocks are striking. A white gel pen and glitter pen make this a super simple card to make.
Thursday, November 8, 2012
Puttin on the Glitz....
.jpg)
Wednesday, November 7, 2012
Winter Memories.....

Tuesday, November 6, 2012
Oh Christmas Tree.....
.jpg)
Monday, November 5, 2012
On the sixth week of Christmas.....
My demonstrator showed me this wonderful card.....this one reminds me of Christmases long ago.....

This card features the stamp set Winter Memories on page 19 of the Holiday Catalog. (#127937 $24.95)
I LOVE this set.....it features three amazing images and two greetings.
Supplies Used:
Basic Black cardstock 5.50 x 8.50
Always Artichoke cardstock 3.75 x 4.75
Cherry Cobbler cardstock 3.00 x 4.25 3.50 x .75
Whisper White cardstock 2.50 x 4.00 2.5 x .50
Black Stazon
Stampin Write markers
Blender pen
Acrylic block
Basically this was a very easy card....just stamp the image with stazon and allow to dry completely. Then I used an acrylic block to scribble the ink from the markers. I picked up the ink with my blender pen and colored the image. After that is just putting the card together as shown in the photo.
Have fun!
Sunday, November 4, 2012
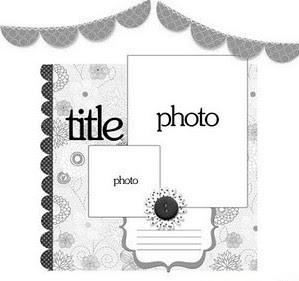
Weekly Sketches...and a challenge......
This weeks sketches are below.....
Carole and Dorothy....the scrap page is my personal challenge to you, cause there is stitching on it.....are you up for the challenge?


Carole and Dorothy....the scrap page is my personal challenge to you, cause there is stitching on it.....are you up for the challenge?


Saturday, November 3, 2012
Just One More for good measure.......
I know you are all pretty much inspired to get creating your Christmas cards by now.....but I thought I would throw in this last one for good measure. 

Come back next week - I will be posting a card a day- All Christmas cards from my Stamp Camp- for the next 30 days! I will include a brief tutorial on each one so you can create them for yourselves!
Fa La La La La......Christmas is coming......51 more sleeps!
Friday, November 2, 2012


Thursday, November 1, 2012
Shel's Stampin News- November 2012
Hi Girls!
Hope you all had a fun filled Halloween with the kiddies! Here is a pic of my two grandsons all decked out:

I have a TON of stuff to tell you about this month.....so let's get started.
1. The new Stampin Trimmer is finally available! Check it out on page 180. I have heard wonderful things about this one from demonstrators who have purchased it. It is wider, sturdier,
2. Clearance Rack- over 70 new items have been added. Go to www.stampinup.ca and click on show now and then clearance rack to check out the awesome deals!
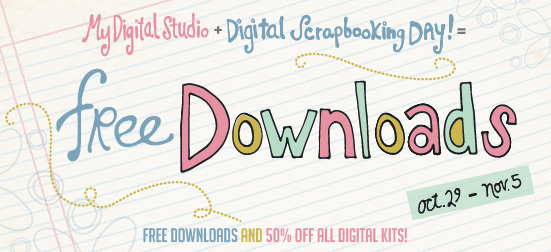
3. Three Free Digital Downloads are being offered in celebration of Digital Scrapbooking Day. From Oct 29-Nov 5- get yours at www.stampinup.ca- click shop now- click My Digital Studio- click free downloads.
4. Stampin Up has introduced a new card making kit:

6. Yesterday Stampin Up announced that Sale-a-Bration will be Jan 22-Mar 22. More details as I get them.


Hope you all had a fun filled Halloween with the kiddies! Here is a pic of my two grandsons all decked out:

I have a TON of stuff to tell you about this month.....so let's get started.
1. The new Stampin Trimmer is finally available! Check it out on page 180. I have heard wonderful things about this one from demonstrators who have purchased it. It is wider, sturdier,
2. Clearance Rack- over 70 new items have been added. Go to www.stampinup.ca and click on show now and then clearance rack to check out the awesome deals!

3. Three Free Digital Downloads are being offered in celebration of Digital Scrapbooking Day. From Oct 29-Nov 5- get yours at www.stampinup.ca- click shop now- click My Digital Studio- click free downloads.
4. Stampin Up has introduced a new card making kit:
FANCY FRIENDS
KIT
October
29, 2012

Get everything you need to make six cards for
only $17.95 (item 132319)! If six isn't enough, add Note Cards to your order
(item 107311)-we've already included extra rhinestones in the Fancy Friends
kit.
To
assemble the cards:
1. Stamp
the doily image in Daffodil Delight or Old Olive ink three times on the card
and once on the envelope, re-inking between uses.
2. Stamp
"Friends" in Daffodil Delight or Old Olive ink on the front of the
card.
3. Adhere
the flowers to the card. Adhere Rhinestone Basic Jewels to the center of the
flowers.
5. November/December Promotion- boy oh boy this is an INK-credible one- both for new demonstrators and for hostesses! Book your party today!
|
.jpg)
7. Single Stamps- as you know, Stampin Up recently introduced single stamps. These are only available for a limited time, so if you have your eye on one, order it soon! Here are all that are currently available:


8. My Class Schedule for November and December:


9. Sketch Challenges:


10. Monthly Tutorial: This month we are learning about Shadow Rolling
|


Subscribe to:
Posts (Atom)