Have you ever had a card where you have used dimensionals to "pop up" your focal image to give it dimension, but are then faced with the problem of where to put the greeting?
Well here is a very easy solution.
Make a "flag strip" from cardstock and stamp your greeting in the center.
Grab your simply scored and score on either side of the greeting( make sure it is at least as wide as your focal image) and then about 1/4 inches to either side.
Fold on the score lines and use your square punch to "flag" both ends.
Now your greeting is high enough to go OVER your focal image that has been pop dotted.
Tuesday, December 18, 2012
Monday, December 17, 2012
Monday Madness- 12th week of Christmas 2012....
Well Christmas is almost here...and instead of a papercraft item....this time I want to share a recipe for a yummy Christmas treat- Fiddle Faddle!

Ingredients
1 cup margarine
1/2 cup corn syrup
1 tea butter flavoring
1 tea maple flavoring
1/4 tea cream of tartar
1 tea baking soda
7 quarts popped popcorn
2 cups mixed nuts
Directions:
In saucepan combine brown sugar, margarine, corn syrup and salt. Boil for 6 minutes stirring constantly
Add flavorings, cream of tartar and soda.
Pour over popcorn and nuts and mix thoroughly.
Bake in 200 degree oven for one hour.
Sunday, December 16, 2012
Sunday Sketches
Hello Girls!
Here are your weekly sketches! Have fun and remember to share your cards and pages!


Here are your weekly sketches! Have fun and remember to share your cards and pages!


Saturday, December 15, 2012
Friday, December 14, 2012
Friday Card Share
Today's card share is a clean and simple card using the clear block stamping method. 

A simple button and jute twine finish off this simple card beautifully.
Want to learn how to make cards and learn techniques similar to this one? Join us for card class- see class schedule at the top of this blog!
Thursday, December 13, 2012
Thursday Tool Talk
Today's tool is not one that you purchase....it is one that everyone already has- your fingernail!

Use your fingernail to "stab" the center of a dimensional that has been applied to card stock. This causes the edge to lift up and make it super easy to remove the paper!
How cool is that!

Use your fingernail to "stab" the center of a dimensional that has been applied to card stock. This causes the edge to lift up and make it super easy to remove the paper!
How cool is that!
Wednesday, December 12, 2012
Wednesday Scrapbooking

This scrapbook page features pictures of my handsome Dad and my beautiful Mom on their wedding day.
Tuesday, December 11, 2012
Tuesday Tip
Use painters tape to mask off a panel on your card.

Be very sure to get a good seal at the edges of the tape, ensuring that ink will not seep underneath the edge.
But we all know that the tape is very sticky, and will rip the card. So take the tape, and adhere it to your sleeve a couple of times, then put it on your card.I have found that this leaves just the right amount of tackiness.
Ink the space between the tape....


Monday, December 10, 2012
11th Week of Christmas......

This is a project shared with us by Stampin' Up. Isn't it lovely! Imagine getting one of these along with a new book....what a great gift idea!
Here are the instructions:
K Bookmark
|
|
Stamps
Broadsheet Alphabet Set
Creative Elements Set
Paper
Peach Parfait Card Stock: 4" x 2-1/2"; 4" x 2-1/2" Pool Party Card Stock: 4" x 4"; 2-1/4" x 4"; 3-3/4" x 1-7/8" Soft Suede Card Stock: 4" x 1-3/8" Very Vanilla Card Stock: 2-1/4" x 4"
Ink
Early Espresso Classic Stampin' Pad Peach Parfait Classic Stampin' Pad Pool Party Classic Stampin' Pad VersaMark Pad Early Espresso Stampin' Write Marker
Accessories & Tools
Clear Stampin' Emboss Powder Early Espresso 1/8" Taffeta Ribbon: 8" Linen Thread: 30" Pearl Basic Jewels Stampin' Dimensionals Color Spritzer Tool Crop-A-Dile Curly Label Punch Dotted Scallop Ribbon Punch Eyelet Punch 1-3/4" Scallop Circle Punch Itty Bitty Shapes Punch Pack Simply Scored |
Instructions
1.
Score diagonal lines from the top middle to the middle of each
side of the Pool Party Card Stock (4" x 4"). Fold the card stock on
the score lines.
2.
Stamp the large flourish image in Pool Party ink on the front of
the bookmark.
3.
Stamp the label flourish image in Early Espresso ink on the
bookmark, and cover it with Clear Stampin' Emboss Powder. Remove the excess
powder and heat emboss the image.
4.
Punch a border along the bottom edge of the bookmark using the
Eyelet Punch.
5.
Adhere the Soft Suede Card Stock strip to the front of the
bookmark. Wrap the Linen Thread around the bookmark three times, and then tie
it in a bow.
6.
Punch a scallop circle from the Peach Parfait Card Stock using
the 1-3/4" Circle Punch and adhere it to the front of the bookmark.
7.
Stamp the large flourish image in Peach Parfait ink on the Very
Vanilla Card Stock. Stamp the letter in Early Espresso ink over the Peach
Parfait flourish and cover it with Clear Stampin' Emboss Powder. Remove the
excess powder and heat emboss the image. Punch out the embossed letter using
the Curly Label Punch.
8.
Punch a small flower from the Pool Party Card Stock (2-1/4"
x 4") using the Itty Bitty Shapes Punch Pack. Distress the flower, adhere
a Pearl Basic Jewel to the center of it, and adhere it to the Very Vanilla
label. Adhere the label to the bookmark using Stampin'
Dimensionals.
9.
Punch a hole in the top of the bookmark using the Crop-A-Dile.
Thread the Early Espresso 1/8" Taffeta Ribbon through the hole and tie it
in a knot.
10.
Stamp "No. 3" on the back of the bookmark.
11.
Stamp the large flourish image in Pool Party ink on the Pool
Party Card Stock (3-3/4" x 1-7/8"). Stamp a border image and a
sentiment in Early Espresso ink on the Pool Party Card Stock. Cover both images
with Clear Stampin' Emboss Powder. Remove the excess powder and heat emboss the
images. Adhere the Pool Party triangle to the folded flaps to keep them closed.
12.
Punch a small flower from the Peach Parfait Card Stock using the
Itty Bitty Shapes Punch Pack. Adhere a Pearl Basic Jewel to the center of the
flower and then adhere the flower to the back of the bookmark.
13.
Punch a border from the remaining piece of Peach Parfait Card
Stock using the Dotted Scallop Ribbon Punch. Adhere the border to the inside of
the bookmark.
Spritz both sides of the bookmark with the Color Spritzer Tool and the
Early Espresso Stampin' Write Marker.
Sunday, December 9, 2012
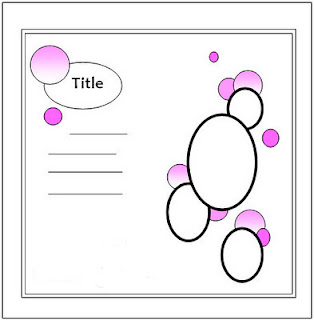
Sunday Sketches
Here are your weekly sketches, have fun and remember to share so we can inspire others!
+copy.jpg)
.jpg)
+copy.jpg)
.jpg)
Saturday, December 8, 2012

Friday, December 7, 2012
Feeling overwhelmed.....
This is a crazy, amazing, wonderful, busy, fun, rushed time of the year. I have just one question...
...
...

Thursday, December 6, 2012
Just like a little black dress......
Sometimes you need....little black pearls to make that perfect card or scrapbook page.
That can be a problem.....a while back I told you how you can take permanent markers ( I use Bic) to color your pearls and rhinestones.
For black ones....this is an even easier option:

Take your fingertip sponge and grab your stazon black ink. Use the sponge applicator to "color" your pearls....voila....the perfect little black pearls!
Wednesday, December 5, 2012
Shel’s
Stampin’ News
December 2012
Hey Girls! Happy
December! Guess what…only 22 more
sleeps!
I hope you all have started your Christmas shopping and
decorating! We put up our tree this week and wrapped all the presents this
weekend, and I mailed my parcel to my parents and my son to the east
coast. So we are well on our way to
being organized and ready to go.
Now I have two weeks of classes, then, plan an early Christmas
with my son Jesse and his family. When
that is done I have to plan Christmas Day dinner with Mike’s boys and
family. Yes it is a busy time of
year!
Saturday, I also did my pre-order for the new Spring
Catalog! I cannot wait to get my new
stamps and supplies, so I can begin creating new cards and scrapbook pages for your
classes!
There is a ton of amazing stuff in the new catalog! I cannot wait to share it with you in January! There are great new framelit dies (and bundles), super new embossing folders, and loads of new stamp set…..and the accessories…oh my!
There is a ton of amazing stuff in the new catalog! I cannot wait to share it with you in January! There are great new framelit dies (and bundles), super new embossing folders, and loads of new stamp set…..and the accessories…oh my!
Also, Sale-a-Bration starts in January 22 and ends March 22 ! WooooHoooo!
It is the best time of the Stampin’ Up! Year……free products! For every $60.00 of products you purchase,
you get to pick one item from the Sale-a-Bration flyer for FREE! WooooooHooooo!
So as you can see, January is going to be a good month!
So as you can see, January is going to be a good month!
Here are your sketch challenges for this month:
Here is our card sketch and a bonus sample for you! This is a sketch and card I made for SUDSOL demonstrators Chat & Challenge.


And your scrapbook sketch:
Here is our card sketch and a bonus sample for you! This is a sketch and card I made for SUDSOL demonstrators Chat & Challenge.


And your scrapbook sketch:

Upcoming Classes:
December:
Thur 6th- Scrapbooking Class- FULL
Thur 13th- Card Class- 1 seat left
January:
Thur 10th- Scrapbooking Class
Fri 11th- Girls Night Out Card Class
Thur 24th- Card Class
Fri 25th- Girls Night Out Scrapbooking Class
Sat 26th- Morning & Afternoon Card Classes
February:
Thur 7th- Scrapbooking Class
Fri 8th- Girls Night Out Card Class
Sat 16th- Specialty Class- Mini Album $25.00 flat fee
Thur-21st Card Class
Fri 22nd- Girls Night Out Scrapbooking Class
Sat 23rd- Morning & Afternoon Card Classes
Well girls, that is it for this month….short and sweet.
Check my blog for daily updates, samples, specials, promotions, tutorials etc.
I want to wish each of you a very happy holiday season. Merry Christmas to all!
Check my blog for daily updates, samples, specials, promotions, tutorials etc.
I want to wish each of you a very happy holiday season. Merry Christmas to all!
Shel
Easy Events for Christmas.....

Tuesday, December 4, 2012


Monday, December 3, 2012
10th Week of Christmas.....

This card is really beautiful and fun to make as well. The only downfall is that it uses quite a bit of cardstock.
Supplies:
Basic Black Cardstock 11x4.25(base 5.5 x 4.25)
Very Vanilla Cardstock 5.25x4
Basic Black Cardstock 4.25x3.75(mat)
Very Vanilla Cardstock 4 x 3.50
Glimmer Paper3.25 x 2.50(mat)
Very Vanilla Cardstock 3.00 x 2.25
Always Artichoke Ink
Raspberry Ripple Ink
Cherry Cobbler Ink
Creative Elements Stamp Set
Watercolor Winter Stamp Set
Greetings of the Season Stamp Set
temporary adhesive
Method:
- use temporary adhesive to adhere all vanilla pieces together and stamp card.
- remove and mat each piece of vanilla on coordinating mats.
- simply line up each mat with images on mat below
You can use any stamps for this technique, and you can even move your mats around so they are offset if you desire. Have fun with this one...it is different from the everyday!
Saturday, December 1, 2012
All the cuteness....without all the work
No, It is not a card....it is another timely promotion for the holidays!
If you are looking of cute ways to package little treats here is an affordable and adorable solution at 20% off!

Trimmings and Tags Bundle includes 25 glassine bags, 25 double sided tags and 10 yard of cherry cobbler sweater trim for just $17.50
Subscribe to:
Posts (Atom)