

This month Angie has paired us up into partners, and we are to CASE a team member!
My partner is Leoni Stuart from Berry, NSW, Australia and after a quick Messenger chat and wonderful video chat, we have chosen to CASE the fabulous Wendy Lee.
Here is the card that Wendy created, for a past ATWOW Blog Hop back in September 2021:

We chose the Timeless Arrangements bundle and three colors:
Garden Green, Boho Blue, and Moody Mauve.

And here are my CASE(s) of Wendy's card:

This first card has a stamped (on white) panel with little circles and crosses. I wasn't sure I liked this one, as it seemed a bit busy for my tastes....however hubby preferred it.
Below is my second attempt, where I replaced the stamped panel with an embossed Moody Mauve panel, which I personally much prefer.
Which do you prefer?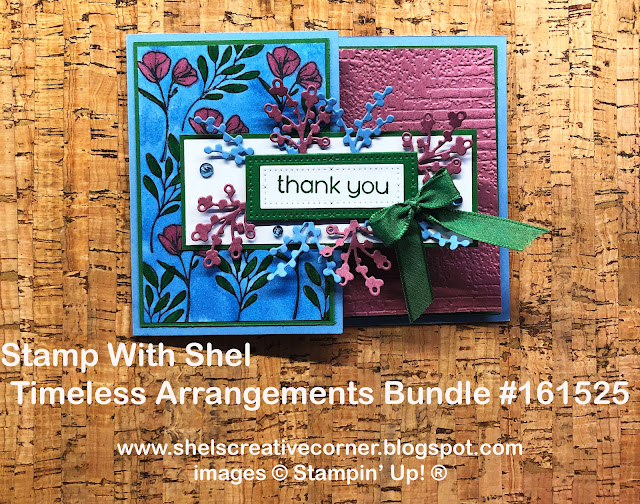

How You Can Make It
Supplies:
Timeless Arrangements Bundle
Exposed Brick 3D
Boho Blue card stock
Moody Mauve card stock
Moody Mauve card stock
Basic White card stock
Garden Green card stock
Garden Green Ribbon
Sparkle Gems 3 pack
Boho Blue and Moody Mauve Stampin' Blends
Garden Green Stampin Write Maker
Garden Green, Moody Mauve, Boho Blue, Memento Black ink pads
Dimensionals, Tombow, Glue Dots
SCEM machine
Measurements:
Card Base: Boho Blue: 8 1/2 x 4 1/4 scored at 3
Inside Mat: Garden Green 5 1/4 x 4
Inside Art Panel: Moody Mauve 5 1/8 x 3 7/8
Inside Writing Panel: Basic White: 4 x 2 3/4
Front Flap Mat: Garden Green2 3/4 x 4
Front Flap Art Panel: Basic White: 2 5/8 x 3 7/8
Banner Mat: Garden Green 4 1/8 x 1 5/8
Banner Mat2: Basic White 4 x 1 1/2
Scraps of Garden Green, Boho Blue, and Moody Mauve for die-cut greenery and tags
Instructions:
- Die-cut green and white tags and greenery from scraps.
- Emboss Moody Mauve panel
- Stamp and color front flap art panel.
- Fold the card base on the score line and burnish it flat with a bone folder.
- Add a Garden Green panel to the inside of the card.
- Add a Moody Mauve embossed panel to the inside of the card.
- Add a Basic White writing panel to the inside flap
- Add Garden Green mat to the outside flap
- Add stamped and colored art panel to the outside flap
- Add a Garden green mat centered on the outside flap
- Add a Basic White mat layer
- Glue greenery to the back of stitched green tag then add to the card front with dimensionals
- Stamp the tag in Garden Green ink and add it to the front
- Embellish with a ribbon bow and dots.


fabulous case Shel ... I like both cards, but maybe the second one just a smidge more. Tough call though. Off to see what Leonie has created!! Such a fun challenge this month. xx
ReplyDeleteWhat a wonderful CASE. I am impressed you made 2 cards. I cannot make a decision which I like better. Both cards are lovely.
ReplyDeleteVery pretty. I feel so special that you chose to case me.
ReplyDeleteLove a Fun Fold!!
ReplyDeleteThese are gorgeous, Shel! At first I thought I had missed some DSP, but no. You've really created some beautiful designs and emphasized the versatility of this set.
ReplyDeleteOh, I love them both! The first on is busy, but I think it's my favorite! Tell your husband he's right! Ha!
ReplyDeleteGreat fun fold!
ReplyDeleteVery sweet, especially your DIY DSP. :-)
ReplyDeleteGorgeous card !
ReplyDeleteI love both of them too! Lovely colour combo.
ReplyDeleteLovely cards!
ReplyDeleteLovely bundle to showcase with this CAS(e), Shel! Love your custom DSP, but the embossed Moody Mauve panel is gorgeous! x
ReplyDelete